MIT Classroom Recording Handbook
last edited: 2024-01-07
There are three ways to video record your class at MIT:
- Hire MIT Video Productions (MVP)
- Example: Ricardo Caballero’s macroeconomics class recordings
- Use a room equipped with auto-capture recording technology
- Example: Jon Gruber’s public finance class recordings
- Use your own equipment
- Example: Russ Tedrake’s underactuated robotics class recordings
MIT Video Productions
MVP sends a technician/videographer in-person to each lecture to manage everything, so you don’t have to worry about anything. The recordings they do are very high-quality. But their service costs $10,000-$20,000 per full-semester course.
Auto-capture
Many classrooms at MIT are equipped with “auto-capture” (automatic capture) recording technology. Auto-capture is a free service. Once it’s set up, all you have to do is put a microphone on your shirt and turn the microphone on/off at the start/end of lecture. The microphone is either always in the room or given to you to keep for the semester. 99% of the required set up is done for you when you request auto-capture for your class – it’s a mostly plug-and-play solution.
There are three kinds of auto-capture technologies, managed by different departments at MIT. No classroom has more than one kind of auto-capture technology.
- IS&T’s auto-capture documentation.
- Open Learning’s auto-capture documentation.
- Sloan’s auto-capture documentation.
How to check if your room has auto-capture
To check if your classroom has auto-capture, you can (1) check the IS&T and Open Learning auto-capture docs that I linked above to see if your classroom is in their list or (2) look up your classroom in the classrooms directory. Most classrooms in E51/E52 (Sloan’s territory) are equipped with Sloan’s auto-capture.
Open Learning auto-capture rooms as of January 2025:
- 2-131, 2-142, 2-190, 6-120, 10-250, 26-100, 32-123, 34-101, 35-225, 45-102, 45-230, 46-3002, 54-100, E25-111, E25-117
IS&T auto-capture rooms as of January 2025:
- 1-135, 1-150, 1-190, 2-105, 3-133, 3-270, 4-144, 4-145, 4-149, 4-153, 4-159, 4-163, 4-231, 4-237, 4-249, 4-261, 4-265, 4-270, 4-370, 5-134, 5-234, 9-354, 16-160, 24-115, 24-121, 26-100, 32-124, 32-141, 32-144, 32-155, 33-419, 37-212, 56-114, 56-154, 66-144, 66-168, E51-057, E51-361
How to request auto-capture to be set up for you
The IS&T and Open Learning docs linked above have instructions for how to request auto-capture to be set up for your classroom if your classroom is in their list.
For rooms in E51/E52 that aren’t in IS&T’s auto-capture list, email stshelp@sloan.mit.edu. [TODO(ashay): I will add instructions here about how you can set up the “zoom room” auto-capture in these classrooms yourself, before 2024-02-15.]
Video quality and ease-of-setup by auto-capture room type
If you have flexibility in choosing a classroom and you know you want to record your class:
- Open Learning’s auto-capture has the highest quality video and easiest setup.
- IS&T’s auto-capture has a spectrum of poor-decent quality video and fairly easy setup.
- E51/E52 (E52 for sure, but I haven’t looked at E51 videos actually) auto-capture has poor quality video and some non-zero setup cost if your class is not a course 15 class and therefore not technically supported by Sloan’s IT department, but easy setup if your class is a course 15 class.
Backup audio
It’s not uncommon for the microphone given to you in auto-capture rooms to fail (it may not have been charged properly, etc.). It’s very unfortunate to lose audio because then you have to redo the lecture if you need a recording.
I recommend having two backup sources of audio. Both are very easy to set up and add about 30 total seconds of overhead at the start/end of each lecture. Here is a document I’ve been giving to instructors that summarizes what to do at the start and end of class in my proposed workflow for classes in auto-capture rooms.
Backup #1: zoom recording on your laptop
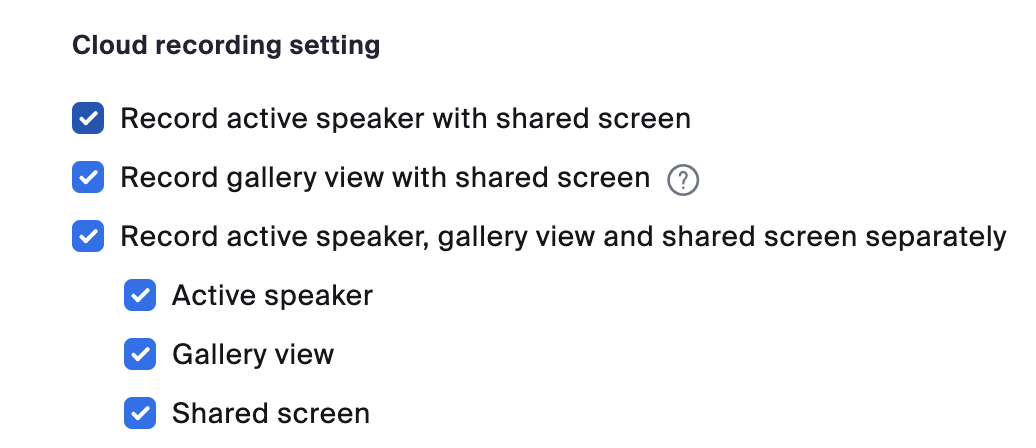
For each lecture, start a zoom meeting on your laptop and start a cloud recording. (Note: you can also pre-schedule zoom meetings and set them up to always do a cloud recording, so then all you have to do is join a particular meeting link at the start of each lecture.) Configure the meeting settings in (https://mit.zoom.us → settings → recording → cloud recording setting) to match those in the image below. During lecture, mute the volume of your computer but keep the zoom application’s mic unmuted. Share screen to zoom if you are showing anything from your computer on the projector at any point in class – might as well also get a backup of that in case the video recording gets messed up somehow. At the end of class, click <end meeting> in the zoom app to make sure the meeting and recording stops.

Backup #2: portable audio recorder
Use a portable audio recorder like the Sony ICD-PX470. Just place it on some surface (not the ground, ideally) next to you and start recording at the beginning of each lecture and stop at the end. These recorders work extremely well: the interface is basically just <start>/<stop> and they can pickup audio fairly well across big classrooms (they’ll capture student questions). If we’re working with you to put your class online, we’re happy to provide you an audio recorder to use for the semester (we’ve bought a few for this purpose) if your budget for the class isn’t sufficient to cover buying one yourself.